 Alisha Zulfiqar
Have you ever wondered how getting your Meta Pixel setup right can make your ad tracking more accurate and easier to manage? Setting it up properly can be tricky, especially if you’re dealing with multiple events, products, or data sources. This guide will help you simplify your Meta Pixel setup so you can track customer actions clearly, reduce errors, and make smarter decisions with your ad targeting.
Quick Summary
For Shopify success in 2026, a proper Meta Pixel setup is non-negotiable. This involves integrating both the client-side pixel and the server-side Conversions API (CAPI) for robust data collection. By verifying your setup, monitoring events, and maximizing Event Match Quality, you can create powerful Custom and Lookalike Audiences for highly effective ad campaigns on Facebook and Instagram.
Why Shopify Stores Need Meta Pixel
The digital advertising world is constantly shifting. With increasing privacy regulations and the move away from third-party cookies, tracking user actions accurately has become more complex. For Shopify merchants, understanding how customers interact with your store is essential for driving sales and scaling your business through effective Facebook Ads.
Evolving Landscape of Digital Advertising and Tracking
Gone are the days of simple, browser-based tracking. Ad blockers are more common than ever, and privacy updates like Apple’s iOS 14 policies have limited the amount of data that can be collected from users. This makes a sophisticated tracking strategy essential for anyone running advertising campaigns.
What is the Meta Pixel?
The Meta Pixel (formerly the Facebook Pixel) is a snippet of code you place on your website. It collects data about the actions users take on your Shopify store, like viewing a product or making a purchase. This data shows how well your ads work. It helps you improve conversions and create targeted audiences for future campaigns.
Why is a Robust Meta Pixel Setup Critical for Shopify?
- A solid Meta Pixel setup allows you to accurately track conversions, from an Add to Cart to a final purchase.
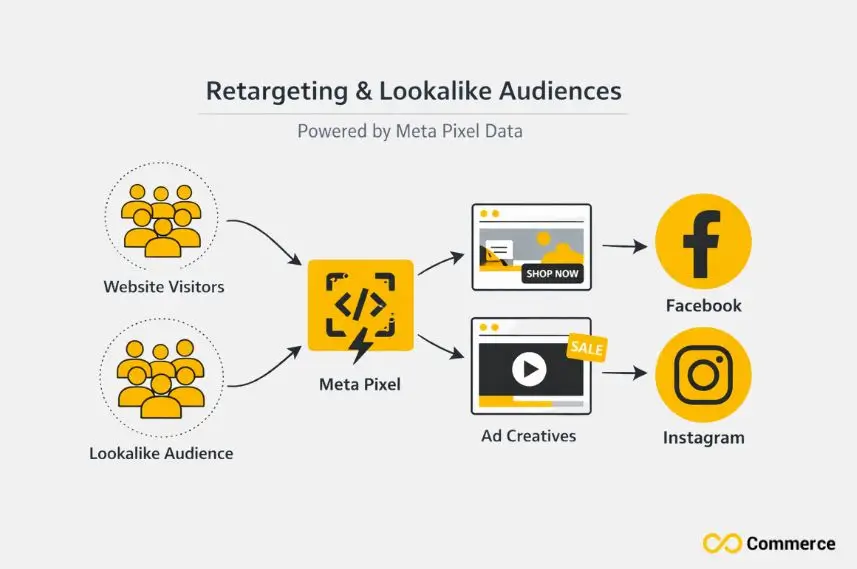
- This data powers your retargeting campaigns, showing ads to people who have already interacted with your store.
- It enables the creation of Lookalike Audiences, finding new customers who are similar to your existing best ones.
- Without it, you are essentially flying blind, unable to measure your return on ad spend or make data-driven decisions.
The Shift to First-Party Data and Server-Side Tracking
As third-party cookies fade away, first-party data has become vital. This is the information you gather directly from your customers. Server-side tracking via the Meta Conversions API (CAPI) sends data directly from your Shopify server to Meta’s, bypassing many of the issues with browser-based tracking like ad blockers.
Meta Pixel Fundamentals for Shopify in 2026
Before diving into the setup, it’s important to understand the core components. Think of it like learning the rules of the road before driving; it makes the journey much smoother.
Understanding the Meta Pixel’s Core Functionality
The pixel works by placing and triggering cookies to track users as they interact with your website. It logs when a user takes a specific action, which you define as a standard event (like ‘Purchase’) or a custom event. These user actions are then sent back to your Meta Ads Manager.
Client-Side vs. Server-Side Tracking
![]()
- Client-Side Tracking: This is the traditional method where the pixel sends data directly from the user’s browser to Meta. It’s easy to set up but can be blocked by ad blockers and is affected by cookie restrictions.
- Server-Side Tracking (CAPI): This method sends data from your Shopify server directly to Meta’s server. It’s more reliable and secure, providing a more complete picture of your conversion events. In 2026, using both is the recommended best practice.
Key Meta Pixel Components
- Pixel ID: This is the unique identifier for your pixel. You’ll need this number (e.g., 1234567890123456) to connect your pixel to your Shopify store.
- Base Code: This is the main JavaScript snippet that you install on every page of your site. Shopify’s native integration handles this for you.
- Events: These are the specific actions you want to track, like ViewContent, AddToCart, and Purchase.
Role of Meta Business Manager and Meta Ads Manager
Meta Business Manager is the central hub where you manage all your Meta marketing and advertising assets, including your ad account and pixels. Meta Ads Manager is where you create, manage, and analyze your advertising campaigns. You will create your pixel in Business Manager and use its data in Ads Manager.
Setting Up Your Meta Pixel (and CAPI) on Shopify
![]()
Now, let’s get to the practical steps. I’ve helped many clients with this process. A careful approach is crucial to avoid problems later.
Pre-Setup Checklist for Optimal Performance
- Have a Meta Business Manager Account: If you don’t have one, create one at business.facebook.com. It’s a non-negotiable for professional advertising.
- Ensure You Have Admin Access: You’ll need admin permissions for both your Shopify admin panel and your Meta Business Manager to complete the integration.
Creating Your Meta Pixel in Meta Business Manager
- Navigate to Business Settings in your Meta Business Manager.
- Under ‘Data Sources’, click ‘Pixels’.
- Click the blue ‘Add’ button and give your pixel a name.
- When prompted, simply enter your Shopify store’s URL and click ‘Continue’. You don’t need to manually install the code; Shopify’s app will handle that. Copy your Pixel ID.
Integrating the Meta Pixel with Your Shopify Store
The easiest and most recommended method is using Shopify’s native “Facebook & Instagram” app. In your Shopify admin, go to the app store, find the app, and follow the setup instructions. It will ask for your Pixel ID and guide you through connecting your ad account and product catalog.
Setting Up the Meta Conversions API (CAPI) on Shopify
During the setup of the Facebook & Instagram app, you will be prompted to set your Customer data-sharing levels. To enable CAPI, you must choose either the ‘Enhanced’ or ‘Maximum’ setting. ‘Maximum’ is the best choice, as it sends the most comprehensive data via CAPI, leading to a higher Event Match Quality.
Verifying Your Setup and Ensuring Data Quality
![]()
How do you know if your setup is working correctly? Don’t just set it and forget it. I always spend time verifying every event fires as expected.
Confirming Pixel Activity with Meta Pixel Helper
Install the Meta Pixel Helper extension for Google Chrome. Visit your Shopify store and navigate through the user journey. The extension icon turns blue. It shows which pixels and events are active on each page. This helps you confirm that your base code and standard events are working.
Monitoring Events and Diagnosing Issues in Meta Events Manager
Go to Meta Events Manager within your Business Manager. Here, you can see a real-time feed of all the activity your pixel is recording. Use the ‘Test Events’ tool to test specific pixel events and ensure they are being received correctly from both the browser and the server (CAPI).
Maximizing Event Match Quality for Shopify Conversions
Event Match Quality is a score from 1 to 10 that indicates how effectively Meta can match your pixel events to Facebook user accounts. A higher score means better ad optimization and attribution. The ‘Maximum’ data sharing setting in Shopify boosts EMQ. It sends hashed customer details, such as email and phone number.
Strategic Best Practices for Shopify Success
![]()
A working pixel is just the start. The real power comes from how you use the data strategically to grow your business, whether you’re a local boutique or an international brand.
Implementing Key Conversion Events Beyond Purchase
While the purchase event is the ultimate goal, tracking micro-conversions is vital. Ensure you’re tracking events like ViewContent, AddToCart, and InitiateCheckout. These actions are strong indicators of user intent and are perfect for building retargeting audiences.
Unlocking Advanced Audiences for Shopify Retargeting Campaigns
Use the data from your pixel to create Custom Audiences. You can build audience segments of users who added items to their cart but didn’t buy, or those who viewed specific products. These audiences are gold for high-ROI retargeting strategies.
The Strategic Use of Multiple Meta Pixels on Shopify
For most stores, one pixel is enough. If you handle different brands or business lines in one Shopify Plus account, you may need multiple pixels. This helps keep your data and audiences separate. This is an advanced strategy and should be approached with a clear plan.
First-Party Data and Privacy-Centric Tracking in a Post-Cookie World
Continue to build your email and SMS lists. This first-party data is invaluable. When you upload customer lists to form Custom Audiences, Meta matches that data with pixel events. This creates a clearer and stronger view of your customer journey.
How Do You Optimize Your Meta Pixel for Ad Performance?
Your pixel is a data-gathering machine; now it’s time to put that data to work to improve your ad performance.
Interpreting Pixel Data in Meta Ads Manager and Meta Business Suite
In your Meta Ads Manager, customize your columns to see pixel-specific metrics like ‘Adds to Cart’, ‘Checkouts Initiated’, and ‘Purchases’. Analyzing this data helps you understand which ads are driving the most valuable actions, not just clicks.
Using Pixel Insights to Refine Ad Targeting and Ad Performance
If you notice an ad is getting a lot of ViewContent events but few AddToCart events, your landing page or product price might be the issue. Use these insights to A/B test different ad creatives, copy, and landing pages to improve your conversion rates.
Retargeting Strategies Powered by Shopify Pixel Data
Go beyond simple cart abandoner ads. Create Dynamic Product Ads that show people the exact products they viewed on your site. You can also build retargeting flows that show different ads to users based on how recently they visited your store.
Testing and Continuous Optimization of Ad Campaigns
Always be testing. Use your pixel data as a baseline and continuously test new audiences, ad formats, and offers. Small, iterative improvements in your advertising campaigns can lead to significant growth over time.
Troubleshooting Meta Pixel Issues on Shopify
Even with a perfect setup, issues can arise. Here are some common problems I’ve encountered and how to fix them.
- Pixel Not Firing or Missing Events: This is often caused by a broken integration or an issue with your theme’s code. First, try reconnecting the Facebook & Instagram app. If that fails, check for any additional scripts that might be interfering, or use the Pixel Helper to diagnose the issue.
- Data Discrepancies and Reporting Inaccuracies: It’s normal to see small differences between Shopify’s analytics and Meta’s reporting. This is due to different attribution models. However, large discrepancies could indicate a problem with your pixel firing or event deduplication.
- Addressing Duplicate Events and Deduplication Errors: If your pixel fires twice for the same action, it will inflate your numbers. Meta Events Manager will flag this. This usually happens if you have the pixel code installed both manually and through the Shopify app. Remove any manual installations.
- Common CAPI Connection Issues and Resolutions: If your server-side events aren’t showing up, go back to your Share data settings in the Shopify app and ensure you’ve selected ‘Maximum’ and that the connection is active. You may need to reconnect the app to refresh the token.
Shopify Tracking Strategy for 2026
The only constant in digital marketing is change. Staying ahead of the curve is what separates successful stores from the ones that get left behind.
Staying Ahead with Meta Technologies and Platform Updates
Follow Meta’s official business blog and developer news. Pay attention to announcements about Meta Technologies and platform updates. Being an early adopter of new features, like advancements in CAPI or new ad formats, can give you a competitive edge.
Importance of Regular Audits and Continuous Optimization
I recommend auditing your pixel setup at least quarterly. Use Meta Events Manager and the Pixel Helper to check that all events are firing correctly and that your Event Match Quality is high. This ensures your data remains clean and reliable.
Integrating with Other Analytics Tools for a Holistic View
Don’t rely on a single source of truth. Integrate your Shopify store with Google Analytics 4. Comparing data from both Meta and Google gives you a more comprehensive understanding of your traffic and customer behavior, helping you make smarter marketing decisions.
Final Thoughts
Mastering your Meta Pixel setup is no longer just a technical task; it’s a fundamental business strategy. By embracing both client-side and server-side tracking, diligently verifying your data, and using those insights to fuel your ad campaigns, you build a powerful engine for growth. This robust data foundation will allow your Shopify store to thrive in 2026 and beyond.
FAQs
1. What is Meta Pixel setup and why is it important for Shopify stores?
Meta Pixel setup means adding Meta’s tracking code to Shopify to track customer actions. It helps improve ad targeting, measure results, and boost sales with accurate data.
2. How do I check if my Meta Pixel is working correctly on Shopify?
3. How do I set up or install a new Meta Pixel on Shopify?
Create your pixel in Meta Business Manager, copy the Pixel ID, and connect it using Shopify’s Facebook & Instagram app.
4. Is adding the Meta Pixel enough for tracking data in 2026?
No, you should also enable Meta Conversions API (CAPI) for server-side tracking. It ensures complete, accurate data even with ad blockers and privacy updates.
5. How can I fix Meta Pixel issues or inactive tracking on Shopify?
Reconnect the Facebook & Instagram app, check Pixel Helper for errors, and enable “Maximum” data sharing.
