 Alisha Zulfiqar
Having trouble understanding how the Meta Pixel Helper works with your Shopify store? Don’t worry, you’re not alone. In this easy guide, you’ll learn how to properly set up your Meta Pixel, use the Meta Pixel Helper to spot and fix common tracking issues, and make sure your Facebook ads are running smoothly to deliver the best possible results for your business.
Quick Summary
This article is your complete guide to mastering the Meta Pixel for your Shopify store. We’ll walk you through setting up the pixel, either automatically through Shopify’s app or manually for more control. Learn to use the free Meta Pixel Helper Chrome extension. It helps you find and fix common issues like missing events, duplicate pixels, and data errors. This way, your conversion tracking stays accurate, and your Meta Ads are more effective.
Why Your Meta Pixel Needs to Be Perfect on Shopify
![]()
A flawlessly installed Meta Pixel is the backbone of successful advertising on Facebook and Instagram. It’s the engine behind your ad targeting, conversion tracking, and optimization. It transforms raw data into winning campaigns. Without it, you’re essentially flying blind.
The Critical Role of the Meta Pixel for Shopify Success
The Meta Pixel (formerly known as the Facebook Pixel) is a small piece of code that you place on your website. It tracks user actions, like page views and purchases, helping you understand customer behavior. This data helps you run effective retargeting campaigns. You can also build lookalike audiences and measure your ad spend return accurately.
Common Pixel Headaches for Shopify Store Owners
Many Shopify merchants run into frustrating issues. These can range from the pixel not firing at all to tracking duplicate purchase events, which skews your data. You might notice wrong product info or missing add-to-cart events. This can hurt your dynamic retargeting ads and waste your budget.
Pixel Helper as Your Diagnostic Tool
This guide is designed to make you a troubleshooting pro. We’ll introduce you to the Meta Pixel Helper, a free web browser extension that acts as your diagnostic partner. You’ll learn how to interpret its feedback to identify and resolve the most common pixel problems quickly and efficiently.
Your Shopify Store’s Data Engine
Think of the Meta Pixel as your Shopify store’s data detective. It watches what visitors do and sends that info to your Meta Ads Manager. This helps you make smart marketing choices and boost growth.
What is the Meta Pixel (Facebook Pixel)?
The Meta Pixel is a snippet of JavaScript code that bridges your Shopify store with the Meta advertising platform. When a customer acts on your site, like viewing a product, the pixel code “fires.” It then sends this info back to Meta, connecting the action to your ad campaigns.
How the Meta Pixel Powers Your Shopify Store
For a Shopify store, the pixel is essential. It tracks the entire customer journey, from the initial ad click to the final purchase event. This steady stream of data brings strong features. For example, dynamic product ads show shoppers items they’ve already seen. It also helps with conversion optimization, which tells Meta to display your ads to those most likely to buy.
Key Meta Pixel Events and Their Importance for Shopify
- ViewContent: Fires when a user views a product page. This tells you which products are getting the most attention.
- AddToCart: Tracks when an item is added to the cart. It’s a strong signal of purchase intent.
- InitiateCheckout: Fires when a user starts the checkout process.
- Purchase: This is the key event. It confirms a successful transaction and helps you calculate your return on ad spend (ROAS).
The Importance of Accurate Data for Facebook Ads & Meta Ads
Inaccurate data leads to wasted ad spend. If your pixel is broken, you might retarget customers with items they’ve already purchased. Also, you could miss tracking sales accurately. Clean, reliable data is the foundation of effective ad targeting and campaign optimization on the Meta platform.
What is the Best Way to Set Up Meta Pixel?
There are a few ways to get the Meta Pixel running on your Shopify store. The best method for you depends on your technical comfort level and how much control you want over your event tracking.
- Method 1: Easy Setup with Shopify’s Facebook & Instagram Sales Channel App. This is the easiest option and works well for most Shopify users. Shopify sets up pixel integration for you. It automatically handles key events like ViewContent and Purchase, so you don’t need to write any code.
- Method 2: Manual Installation (For More Control & Deeper Integration) If you want to add custom events or track specific actions, you can manually insert the pixel-based code into your theme’s theme.liquid file. Then, add event snippets to the relevant pages or your checkout settings. This requires more technical skill but offers greater flexibility.
- Method 3: (Advanced) Integrating Meta Pixel via Google Tag Manager For full control, use Google Tag Manager (GTM) to manage your Meta Pixel.
This method keeps all your tracking tags in one spot. It’s great for complex setups. However, it has the steepest learning curve. It’s mainly for advanced users or those already using GTM with tools like Google Analytics.
Introducing the Meta Pixel Helper
![]()
Once your pixel is installed, you need a way to verify it’s working correctly. That’s where the Meta Pixel Helper comes in. It’s an indispensable tool for every Shopify store owner running Meta Ads.
What is the Meta Pixel Helper?
The Meta Pixel Helper is a free Chrome extension created by Meta Technologies. It runs in the background as you browse your own online store and tells you what pixels it finds on each page and whether they have fired successfully.
Why Every Shopify Store Owner Needs This Chrome Extension
This tool takes the guesswork out of pixel troubleshooting. Instead of digging through code or wondering why your Ads Manager data looks wrong, you get instant, page-level feedback. It helps you catch tracking errors before they cost you money, whether you’re at your desk in New York or checking things on the go.
How to Install the Meta Pixel Helper
Installing the tool is simple:
- Open the Google Chrome Web Store.
- Search for “Meta Pixel Helper.”
- Click “Add to Chrome.” The icon will appear in your browser’s toolbar.
Interpreting Pixel Helper’s Icons and Basic Status Indicators
When you visit a page on your site and click the Pixel Helper icon, you’ll see a small popup. A green checkmark next to an event means it fired correctly. A yellow triangle or red error icon indicates a problem that needs your attention, such as a missing parameter or a failure to load.
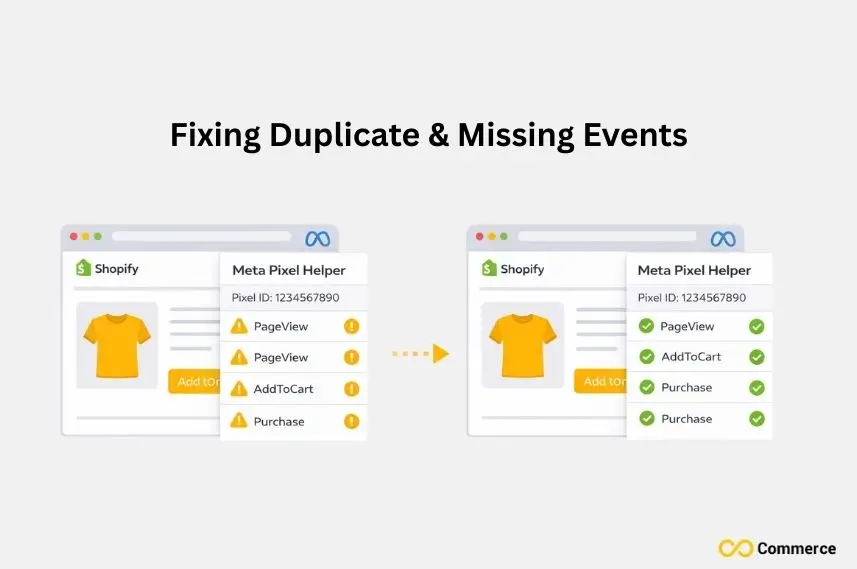
How Do I Fix Common Pixel Problems?
![]()
Using the Meta Pixel Helper, you can diagnose and fix the most frequent issues that plague Shopify stores. Let’s walk through them.
- Issue 1: “No Pixels Found” or “Pixel Did Not Load”: This means the base pixel code isn’t present on the page. If you used the Shopify app, try reconnecting it. If you installed it manually, check that the code is in the correct <head> section of your theme.liquid file.
- Issue 2: Incorrect or Missing Standard Events (Pixel Event): Are AddToCart events not firing? The Pixel Helper will show you. This often happens with custom themes. You may need to manually add the event snippet to your product page’s “add to cart” button code.
- Issue 3: Missing or Incorrect Event Parameters (Crucial for Product Data) Dynamic ads need certain parameters. These include content_ids and value.
If the Pixel Helper flags these as missing, it means your product catalog might not be synced correctly. Ensure your Shopify Product Feed is healthy and products have unique IDs. - Issue 4: Duplicate Pixel Events: This is a common problem that inflates your data. It often occurs if you’ve installed the pixel both manually and through the Shopify app. Use the Pixel Helper to identify the duplicate Pixel ID and remove one of the installation methods.
- Issue 5: Data Discrepancies Between Shopify and Meta Ads Manager: If your Shopify sales don’t match your Meta purchase events, it could be due to ad blockers, privacy settings from iOS 14, or attribution window differences. Using the Facebook Conversion API (CAPI) boosts accuracy. It allows for server-side tracking.
Advanced Troubleshooting & Optimization for Shopify Pixels
![]()
For those looking to get the most out of their tracking, it’s time to go beyond the basics.
- Leveraging Meta Events Manager for Deeper Insights: Your Meta Events Manager is the command center for your pixel. Use its “Diagnostics” tab to see a running list of issues. The “Test Events” tool is also invaluable for testing user actions in real-time to ensure each event fires as expected.
- Understanding and Reducing the Impact of Privacy Changes (iOS 14, GDPR)
Privacy laws, such as Apple’s iOS 14, have restricted browser-side tracking.
To combat this, set up Meta’s Conversion API (CAPI) through the Shopify Facebook & Instagram app. This sends data straight from Shopify’s server to Meta’s. It creates a more reliable connection that browser settings can’t block. - Best Practices for Managing Your Shopify Product Catalog and Product Feed for Pixel Accuracy: Keep your product data clean. Ensure every product and variant has a unique SKU or barcode, and use consistent IDs across your Shopify store and Meta Product Catalog. This prevents product ID errors that can break dynamic ads.
Proactive Pixel Maintenance and Prevention Tips for Shopify Stores
Don’t wait for problems to arise. A little proactive maintenance can save you major headaches down the road.
- Regularly check your pixel health with the Meta Pixel Helper, especially after you update your Shopify theme or install new apps.
- Implement a consistent naming convention for any custom events you create. This makes your data much easier to analyze in Meta Events Manager.
- Stay updated with Shopify and Meta’s latest recommendations for data sharing and tracking.
- Monitor your Meta Ads Manager and ad performance for any sudden dips, which could indicate a tracking error.
- Document your pixel setup. Include the installation method you chose and any custom events you set up.
Master Your Meta Pixel for Unstoppable Shopify Growth
A healthy Meta Pixel is not a “set it and forget it” tool. It’s a living part of your marketing ecosystem that requires attention. Master the setup and learn troubleshooting with the Meta Pixel Helper. This way, you unlock the full power of the Meta advertising platform.
Conclusion
Use the Meta Pixel Helper to ensure your pixel is installed correctly and tracking accurately. Fix issues like missing events or duplicate data for better performance. A properly set up pixel enhances targeting, boosts retargeting campaigns, and drives long-term growth. Check key Shopify pages to start optimizing your tracking today.
FAQs
The Meta Pixel Helper is a free Chrome extension by Meta that checks if your Meta (Facebook) Pixel is installed correctly on your Shopify store. It instantly detects firing issues, duplicate pixels, or missing events to ensure accurate ad tracking.
The Meta Pixel is essential for tracking customer actions, optimizing ad targeting, and boosting sales. Without it, you lose key data for retargeting and performance measurement, reducing your Meta Ads effectiveness.
Infinite Facebook TikTok Pixels is one of the highest-rated apps for managing multiple pixels, integrating Conversion API, and syncing Meta events accurately, no coding required.
Yes, Meta Pixel Helper helps you find errors like “Pixel did not load” or “Duplicate events.” Once detected, you can reconnect your Pixel, remove duplicates, or validate parameters for flawless event tracking.
The simplest method is through Shopify’s Facebook & Instagram app, which connects automatically. For advanced tracking and multi-pixel setups, try Infinite Facebook TikTok Pixels for a smoother integration experience.
