 Amber Naz
Summary
Google Tag Manager is one of those tools that looks intimidating until you see how little it actually does. It does not track anything by itself. It is a container that holds your tracking tags, so you can add, change and remove them from one dashboard instead of editing your store’s code every time a marketer asks for a new pixel.
On Shopify there is one extra wrinkle: Shopify’s checkout and customer events work differently from an ordinary website, so the usual “paste two snippets into the theme” tutorials do not always apply. This beginner guide explains what GTM is, how to set it up on Shopify using Shopify’s own documented route, how to fire and test your first tag, and where beginners usually go wrong. It draws on Google’s Tag Manager help pages, Shopify’s documentation on custom pixels and customer events, and Infinite Commerce’s own app listing. Where a detail could not be confirmed from a primary page, the article says so.
Quick answer
- Create a GTM account and a web container at tagmanager.google.com.
- Get the container’s install code from the GTM Admin area.
- Install it on Shopify. Shopify’s documented route is a custom pixel that loads GTM and pushes Shopify’s customer events to the dataLayer. The no-code alternative is an app such as Infinite Commerce’s Google Ads Tracking and GTM app.
- Create a tag, a trigger and variables for your first event.
- Test in Preview mode, then publish.
- Run a real test order and check your ad and analytics platforms.
If you are not comfortable with JavaScript, the app route is usually the safer choice. Shopify itself describes custom pixels as an advanced feature that requires JavaScript knowledge and is unsupported by Shopify.
What Google Tag Manager does (and does not do)
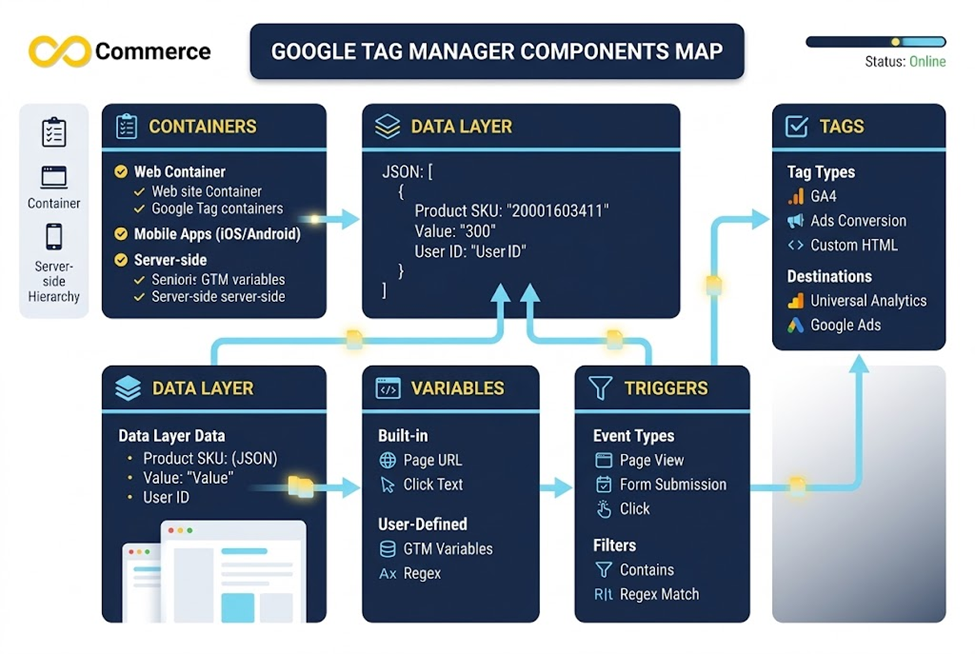
According to Google’s help pages, Tag Manager is a tag management system that lets you manage tags without changing your website’s code each time. A few terms are worth learning before you start:
| Term | Plain-language meaning |
| Container | The package of tags, triggers and variables for one site |
| Tag | A piece of tracking code, such as a Google Ads conversion or a GA4 event |
| Trigger | The rule that decides when a tag fires |
| Variable | A value a tag or trigger uses, such as a product name or order value |
| Data layer | A JavaScript object that passes events and values from your site to GTM |
Google describes the data layer as a JavaScript object that Tag Manager uses to pass events and variables to tags, structured as JSON. Your store (or a pixel) pushes information into it, and GTM reads it.
What GTM does not do: it does not collect data on its own, it does not fix broken events, and it does not make your tracking compliant. A tag that is configured wrongly still sends wrong data, just faster.
Why Shopify stores use GTM
- One place for tags. Google Ads, GA4, Meta, Microsoft and other tags live in one container.
- Fewer code edits. Marketers can change tracking without a developer release.
- Testing before going live. Preview mode shows what fires before anything is published.
- Version history. You can see what changed and go back to an earlier version.
There are trade-offs too. GTM adds a layer of setup, and on Shopify the checkout environment limits what scripts can do, as explained below. If you only need Google Ads conversion tracking, a dedicated app may be simpler than a full GTM build.
How Shopify’s tracking environment affects GTM
Shopify’s checkout and customer events are handled through its pixel system. Shopify’s custom pixels documentation says custom pixels let you collect customer events on more pages, such as checkout and post-purchase pages, without modifying theme code. It also says they load in a “lax sandbox” meant to improve security and control over data sent to third parties, and that not all pixel functionality works in the sandbox.
For GTM, this has practical consequences, and Shopify’s own GTM custom pixel tutorial lists them:
- Tag managers inside the pixel sandbox face the same restrictions as other pixels.
- The sandbox has no equivalent of GTM’s stateful dataLayer object, so you build your own data object and pass it into custom events.
- You cannot add custom data to standard events. You publish your own custom events instead.
- Outbound link clicks are not detected automatically, so enhanced measurement events must be built by you.
- Google Tag Assistant’s Troubleshoot tag feature does not detect Google tags in custom pixels.
Treat these as a checklist of “things that behave differently from a normal website.” They are the main reason GTM on Shopify is not a copy-paste job.
Step 1: Create your GTM account and container
Per Google’s setup instructions:
- Go to tagmanager.google.com and sign in with a Google Account.
- Open the Accounts tab and select Create Account.
- Enter an account name and select the account’s country.
- Enter a container name. For a website, Google says the container name should be the top-most URL of your website.
- Choose the container type Web.
- Click Create and agree to the Terms of Service.
Use a Google account that your business controls, not a freelancer’s personal address, so that access does not walk out the door with someone.
Step 2: Choose how to install GTM on Shopify
You have two realistic options.
Option A: Shopify custom pixel (documented route)
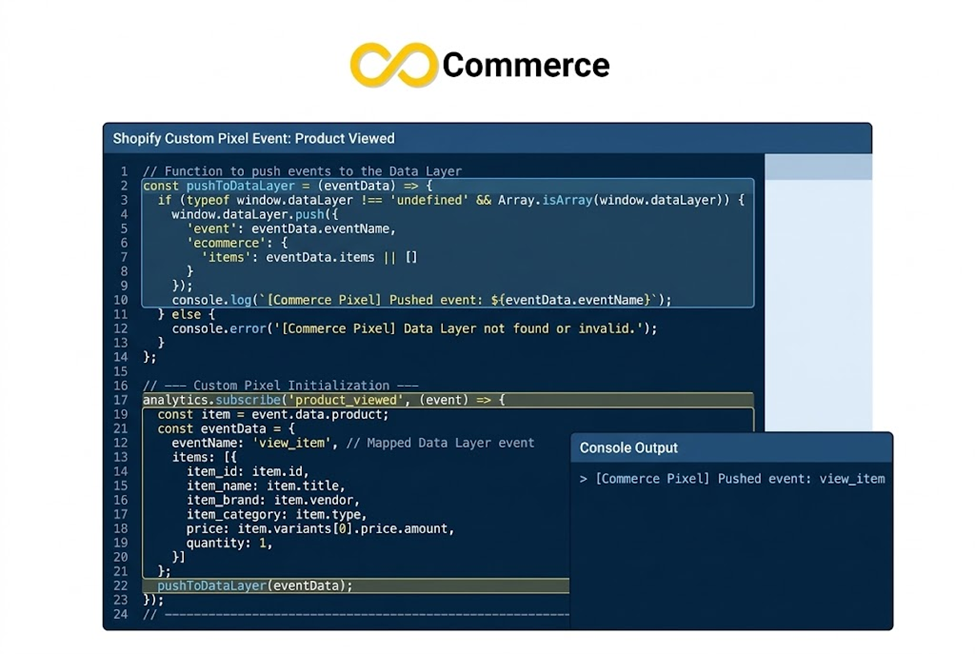
This is the route Shopify documents. Its tutorial lists these steps:
- In Google Tag Manager, open Admin and get the install code for the head section.
- Remove the surrounding HTML tags so only the script code remains.
- Paste that code into a new Shopify custom pixel.
- Add analytics.subscribe handlers that push events to window.dataLayer.
- In GTM, create a custom event trigger, tags and dataLayer variables to receive the events.
The tutorial’s example shows how an event is passed:
analytics.subscribe(“product_viewed”, (event) => {
window.dataLayer.push({
event: “product_viewed”,
product_title: event.data?.productVariant?.title,
});
});
The tutorial also notes that its sample code includes Consent Mode v2 values such as ‘ad_storage’: ‘granted’, and that these are examples that may not fit your region’s privacy laws. Do not copy consent defaults without checking them.
Shopify’s standard events include page_viewed, product_viewed, collection_viewed, cart_viewed, product_added_to_cart, search_submitted, checkout_started, payment_info_submitted and checkout_completed. The tutorial says standard events map to GA4 names, for example checkout_started to begin_checkout and checkout_completed to purchase.
Shopify states that it does not support custom pixels, so compliance, consent, code security, troubleshooting and updates are your responsibility. If you are not comfortable with JavaScript, hire a Shopify Partner or use the app route.
Option B: A no-code app
Infinite Commerce’s Google Ads Tracking and GTM app connects a Shopify store to Google Ads and Tag Manager without code. According to its page, setup is three steps: install the app from the Shopify App Store, enter your Google Ads Conversion ID or GTM Container ID, and click Connect. The page says setup takes under 5 minutes, and that tracking then starts automatically for events including page views, add to cart, checkout and purchase.
Plans listed on the page, billed monthly in USD, are:
- Standard, $9.99: one Google conversion tracking, GTM integration, Page View, Add to Cart, Begin Checkout, Purchase and Live Chat.
- Premium, $19.99: adds multiple conversion tracking, Bing and GA4 integration, unlimited server-side setup and Enhanced Conversion.
- Shopify Plus, $29.99: Premium features plus Checkout Extensibility and a dedicated support agent.
Each plan lists a 7-day trial. These are the prices on the page at the time of writing, so check them again before you install. As with any tracking tool, verify the events it sends in your own store rather than assuming.
Which should you choose?
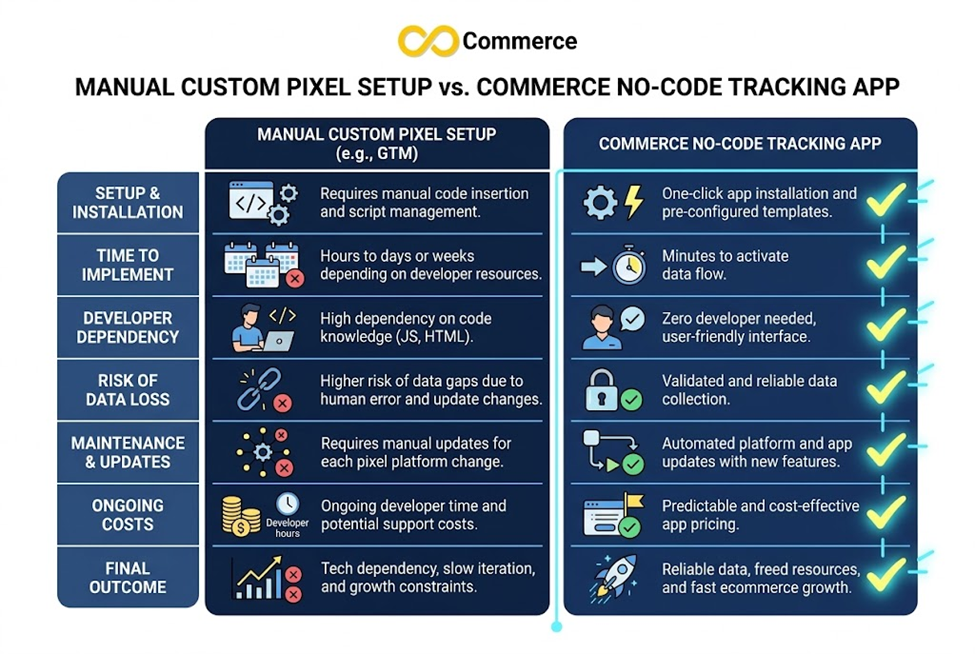
| Features | Custom pixel | App |
| Skill needed | JavaScript | None |
| Support | Shopify does not support it | Vendor support |
| Control | High | Depends on the app |
| Cost | Your time or a developer | Monthly plan |
| Best for | Teams with a developer | Beginners and small teams |
Step 3: Fire your first tag
For a first win, send a simple event to Google Analytics 4 or Google Ads. The mechanics are the same for any tag.
Create the Google tag
Google’s instructions for the Google tag are:
- In your container’s Workspace, go to Tags and click New.
- Name the tag.
- Under Tag Configuration, choose the tag type Google Tag.
- Enter your Tag ID.
- Under Triggering, select Initialization – All Initialization Events (or Some Initialization Events).
- Click Save.
Create a trigger and variables for an event
If you used the custom pixel route, your pixel pushes events with an event key. Google’s data layer documentation explains that Tag Manager uses the special event key to fire tags, and that you can listen for a pushed event name with a Custom Event trigger. So:
- Create a Custom Event trigger whose event name matches what your pixel pushes, for example product_viewed.
- Create Data Layer Variables for each field you want, such as product_title. Shopify’s tutorial says each payload field you want to capture needs its own variable, and that at least one tag and trigger must be set up for data to transfer.
- Create a tag (for example a GA4 event tag) that uses the trigger and passes the variables.
Start with one event. Product views are a good first choice because they are easy to trigger and check.
Step 4: Test in Preview mode
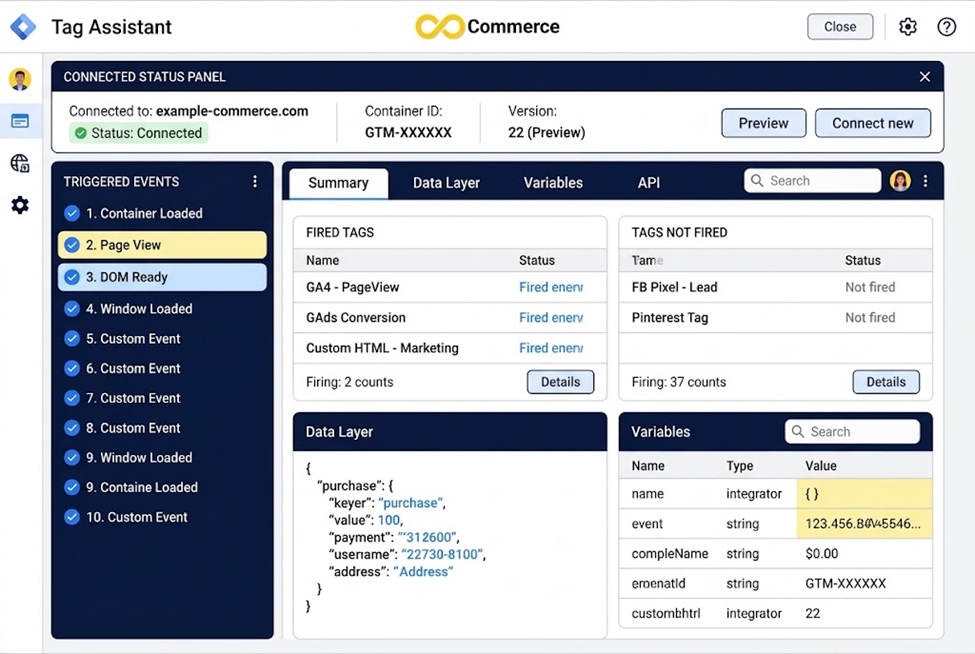
Do not publish untested tags. Google’s preview instructions are:
- Open your container’s Workspace tab and click Preview at the top right.
- Tag Assistant opens in a new tab. Enter your site’s URL.
- If the site breaks with the debug parameter in the URL, uncheck Include debug signal in the URL.
- Click Connect. Your site opens and shows Connected in the bottom right.
- Return to Tag Assistant and click Continue to open the debug interface.
- Browse your site. The interface shows which tags and triggers fired, and what data they processed.
For each event, check that:
- The tag fired once, not zero times or twice.
- The values (product name, price, currency) are correct.
- The trigger name matches the event name exactly.
Two Shopify-specific cautions: Shopify’s tutorial says Tag Assistant’s Troubleshoot tag feature does not detect Google tags in custom pixels, and the checkout runs in a restricted environment, so confirm checkout events with your analytics reports and a test order, not only in Preview.
Step 5: Publish and name your version
Per Google’s publishing instructions, publishing makes workspace changes active. Click Submit, keep Publish and Create Version selected, review the changes, give the version a name and description, and click Publish. Good version names say what changed, such as “GA4 product_viewed tag added.”
Versions are snapshots of your container configuration, and Google says they help you recover from mistakes. To go back, open Versions, select an earlier version and publish it, or set it as the latest version to replace your current draft and edit from there.
Step 6: Test with a real order
Preview mode shows tags firing. It does not prove that the numbers reach Google Ads or GA4 correctly. After you publish:
- Place a test order through the full checkout, using a payment method you can refund or a test mode if your setup allows.
- Check that the purchase event arrives once, with the right value and currency.
- Look for the event in your analytics and ad platform reports after their normal processing delay.
- Compare the order count in Shopify with the conversions recorded.
Small differences between platforms are normal. Large gaps point to a problem: missing events, duplicates, or consent settings blocking tags.
Common beginner mistakes
- Two installs of GTM. Loading the container through both an app and a custom pixel can double-count events. Pick one route.
- Duplicate tags. An app, a theme and GTM all sending the same purchase event inflate your conversions.
- Ignoring consent. Shopify says compliance with consent laws is your responsibility when you use custom pixels. Set up consent handling for your regions before you rely on the data.
- Publishing without Preview. One wrong trigger can fire a tag on every page.
- Trigger names that do not match. productViewed and product_viewed are different events.
- Expecting checkout to behave like the storefront. Test checkout events separately.
- No documentation. Keep a simple log of tags, triggers and who changed what.
GTM, apps or both?
You do not have to choose one forever. A common progression is to start with an app for the basics, such as Google Ads conversions, and move to a custom GTM build only when you need tags the app does not cover. If you do run both, make sure they do not send the same events twice. The same trade-off applies to other platforms: if you also run Meta ads, our guide to adding Facebook Pixel to Shopify without apps shows what the manual route involves.
Final thoughts
GTM on Shopify is straightforward once you separate the three jobs: install the container, send events into the data layer, and build tags that read them. Use Shopify’s documented route or a no-code app, start with one event, test in Preview and with a real order, and name every version you publish. Keep an eye on consent and duplicates, and add more tags only when the first ones are proven.
Set up Google Ads and GTM tracking without code
If you would rather not build and maintain a custom pixel, Infinite Commerce’s Google Ads Tracking and GTM app connects your Shopify store to Google Ads and Tag Manager, with a 7-day trial on each plan. If you want help checking your events or planning your tracking, contact our team.
FAQs
Google describes Tag Manager as a tag management system; check Google’s current plan information for pricing, since this article did not verify it. Apps and developer help have their own costs.
Not if you use an app that accepts a GTM container ID. Shopify’s custom pixel route needs JavaScript knowledge, and Shopify says it does not support custom pixels.
It is shown in your GTM workspace. Shopify’s tutorial points to the install code in the container’s Admin area. The container ID takes the form GTM- followed by characters, which is how Shopify’s tutorial shows the placeholder.
Checkout runs in a restricted environment, and Shopify’s tutorial says Tag Assistant’s Troubleshoot tag feature does not detect Google tags in custom pixels. Confirm checkout events with a real test order and your analytics reports.
Yes, but plan the split. Decide which tool sends each event, so nothing is counted twice.
Every script has a cost. Keep the container lean, remove tags you no longer use, and review what fires on each page.
